|
|||
|
|
|
||
| View Shopping Cart |
| Home |
| Guides Available |
| About the Author |
| FAQs |
| Testimonials |
| Articles |
| Contact Andrew |
| Terms & Conditions |
| Mailing List |
| Links |
 |
 |
Gibbs Guides.com
More high
quality information absolutely
free with every
Gibbs Guides newsletter.
Sign
up now!
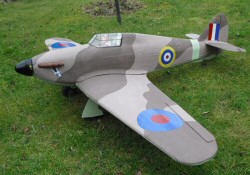
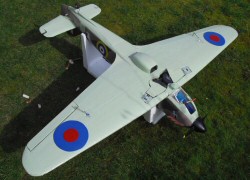
A maximum fun, minimum cost warbird:
The story of my all-foam Hurricane project.
By Toni Reynaud
Part 3– Power system, details and preparation for flight
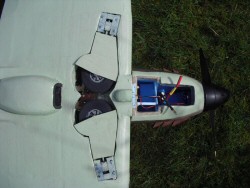
Installing the power system
I ordered a 400W motor and 70A ESC from 4-Max.co.uk. To
mount the motor, I made a plywood box which was fitted
to the firewall in the position indicated by the plan.
I hollowed out the inside of the cowling to gain sufficient
clearance, and found I'd fitted the motor off centre -
it was off by 2mm to one side and was also 8mm too low.
To solve this problem I created a new set of mounting
holes, refitted the box, and found the motor was now 2mm
high! At this point I lost patience, so I cut the 75mm
plywood nose ring off the model and replaced it with a
75mm plywood nose disc, and mounted the motor straight
onto that. This was much easier and put the motor in the
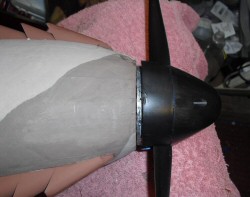
right place! I then permanently glued the cowling onto
the front of the fuselage with 5 minute epoxy, and all
was well with the world.
|
|
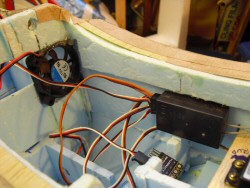
Next I had to cut an access slot in the bottom of the cowling, then fiddle the ESC mounting and connection and a battery mounting system. The ESC needed to be kept cool, which inside the thick foam cowl with no radiator opening was not going to be easy. To supply the ESC with cooling air, I decided to use the scale radiator air inlet - I cut through the wing above the radiator to admit air into the fuselage, and then fitted a small computer fan onto the bulkhead between the wing bay and the motor bay to draw air from the fuselage interior past the battery area into the cowl. It is connected direct to the 3-cell lipo, and wired such that any time the flight battery is connected, the fan will run. It consumes about 40 mA, an insignificant current compared to the many Amps the motor demands. I could probably have got away with using just forced air cooling in flight, but this way after landing the fan continues to run, and this helps to prevent any heat buildup in the motor bay which will be kinder to my motor and ESC!. The cooling air is allowed to exit the cowling through the exhaust outlets each side of the nose.
With everything in place, including the two 3S 2,800mAh lipo packs, I weighed the Hurricane, and found it tipped the scales at 2.1 kg (4lb 1oz). This should fly nicely, I thought. Then I checked the balance point (90mm from the leading edge) and was disappointed to find the model was tail heavy! If I'd realised this would be the case, I would have lightened the rear of the spine and the rearmost formers during the build to bring the balance point forward. I found that 225g (8oz) of lead was needed to achieve the correct balance position, taking the flying weight to 2,325g (4lb 9oz). Adding this weight meant the flying weight increased by 12.5%. This was something of an annoyance, though the model was still very light. I ended up with a disc of lead screwed to the nose ring behind the spinner.
|
|
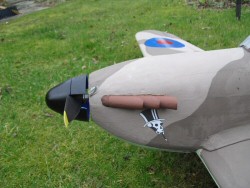
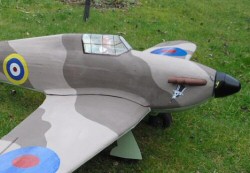
Painting and detailing.
The paints I used are samples of matt household emulsion from B&Q,
but reading up about night fighter Hurricanes, I found that the use of
matt paint slowed the full size machine down noticeably, so gloss was
used. Therefore I will cover the whole model with a glossy clear varnish
when the (minimal) detailing is finished.
|
|
Checking the power system
Time to check the power system. The motor is rated at
400W and has a Kv of 1,000. The ESC is 60A rated. The
batteries I'm using are either a pair of 3S 2,800mAh Mystery
packs, or else a pair of 3S 2,500mAh Hyperion packs from
Robot birds. In either case the batteries are connected
in parallel so the motor still 'sees' a 3S pack but of
double the capacity of a single battery. Initially I fitted
a 12x8 propeller. With the model safely tethered, everything
connected and the controls answering to the radio it was
time to open the motor up. The power system worked smoothly,
and it felt like there was a lot of power. A quick look
at my Medusa Power Analyser at full throttle showed 613W
at 56A - way more power than I had anticipated. Half throttle
gave about 250W, which I thought could be a good cruise
setting. However, bearing in mind that it's not good to
overstress the motor or ESC, I changed the prop for an
11x7. This gave 464W at 42.5A, with the battery voltage
about 10.5V on load.
|
|
First flights
The weather and other commitments finally came together, so I went over
to my local flying site at Thorney Island. The wind was force 2-3, N-NE.
Perfect flying weather, with the sun (if there had been any!) at my back.
I got the model assembled, made a range check, carefully checked the controls
and motor, took a deep breath and started the take off. The model veered
a bit to the right, which I caught with rudder with no problem. The tail
came up so quickly that the model almost nosed over, but I caught that
too, then I gave it a bit more up elevator, and off it went. I gained
height in a wide circuit, put the undercarriage up while it was overhead,
and gained more height.
The model cruised nicely on half throttle. From level flight at full chat I can pull a large loop. Axial rolls need a little down elevator applied when inverted. The stall at low throttle is gentle, but positive - the left wing falls away and the plane noses over. With a bit more throttle, it just mushes with full up elevator applied. Low passes, both fast and slow look good. The elevator is quite sensitive. After five minutes I lowered the undercarriage and did one more low circuit, then landed.
A post flight inspection revealed that the batteries and ESC were barely warm to the touch, so the cooling system seems to work. 2,400 mAh went back in the batteries after the first flight, representing a little under half the capacity of the packs, so 9 or 10 minute flights should be within reach.
Since this first flight I've made several more flights (one very short as I had to land straight after the first circuit to get my sunglasses on!) and the model continues to fly well. The model flies well at between half and three quarter throttle flying. Later I'll get a more experienced and capable pilot to wring it out and see how it goes.
Costs
The interesting thing is that apart from the paint, motor, spinner, ESC
and one set of batteries, the whole model was made from my bits box or
by using materials to hand, so total cost of the airframe was ZERO! The
other parts were obviously a little more costly, but all in all, this
model has been good value for money.
| Hurricane technical data | ||
| Span | 1,575mm | 62 inches |
| Length | 1,220mm | 48 inches |
| Flying weight (2 x 0,000mAh 3S LiPo) |
2,390g | 5lb 4oz (84oz) |
| Wing Area | 0.383 sq m | 593 sq in = 4.12sqft |
| Wing Loading | 624g/dm | 20 oz/sq ft |
| Batteries | 2 x 2,500mAh LiPo | |
| Motor | PPO-35.42-1000 (rated @ 540W) | |
| Prop | 12x8 | |
| Battery | 3S 5,000mAh or 5,600mAh | |
| Max current & max power | approx. 55A, 550W | |
| Power Loading | 230W/kg | 100W/lb |
| Average in flight power consumption | 000W, equivalent to 00W/lb | |
| Control | 5 functions: ailerons, elevator, rudder, throttle and undercarriage | |
Postscript
In conclusion, this model is a pussycat, its lovely to fly and is smooth
and stable. All in all it's a really nice model and I'm well pleased with
it. Long live foam!