|
|||
|
|
|
||
| View Shopping Cart |
| Home |
| Guides Available |
| About the Author |
| FAQs |
| Testimonials |
| Articles |
| Contact Andrew |
| Terms & Conditions |
| Mailing List |
| Links |
 |
 |
Get more high quality electric modeling information, absolutely free:
Sign up for the Gibbs Guides newsletter now!
Beginner's Guide: Getting Started
Part 2
By Andrew Gibbs
What will you need to buy?
To get started in electric modelling you’ll need the following:
(i) A suitable model, along
with a few tools and glues
etc to build it.
(ii) A suitable power system:
motor, prop driver &
suitable prop, battery,
speed controller (ESC) and
connectors.
(iii) A charger, plus a
suitable balancer.
(iv) A suitable ‘field’
power source for your charger.
A 12V battery is a common
choice. You may also like
to acquire a mains powered
12V power supply for workshop
use.
(v) A set of radio control
equipment.
Let’s look at these one at a time:
One
day – but perhaps
not just yet! |
Model
type
If you want to learn to
fly, then your choice of
model type is important
to maximise your prospects
of a becoming a competent
RC pilot. Its important
to be level headed about
this choice, otherwise you
can find the business of
learning to fly very unsatisfying.
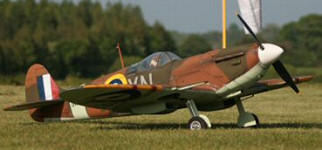
However appealing a Spitfire
may be, unfortunately it’s
not suitable as an aircraft
to learn with. In the full-sized
world of flying, new pilots
start with a trainer, and
in the same tradition we
model pilots are best off
with the same approach.
Generally, suitable training models are high winged types which are purpose-designed for the job. The particular requirements of a training model are:
a) It should be as easy to fly as possible, with good natural stability. This generally means a high wing design with broad chord (the front to back dimension) wings for easy handling and predictable stall behaviour. However, not all high wing aircraft are suitable for training, so choose with care.
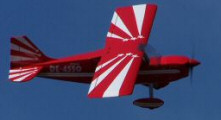
High
winged models aren’t
always trainers. This
Decathlon is fully
aerobatic –
lots of fun for the
experienced pilot
but not a suitable
model for beginners. |
b) It should be large enough to be sufficiently docile, easily seen and able to deal with turbulence and gusts, yet small enough to be practical and reasonably able to withstand the rough and tumble of training. These requirements mean that medium sized models tend to be favoured, the ideal wingspan probably being somewhere between 40 and 65 inches (100 - 163 cm). All else being equal, models towards the larger end of this range will be significantly easier to fly for a beginner. Smaller models may require hand launching and so offer less opportunity to learn about take offs. Powered gliders can safely be a little larger, perhaps between 55 and 72 inches (140 – 180 cm) wingspan.
c) It should have sufficient power – but definitely no more than this. Overpowered models are much harder to learn with and excess power should be avoided like the plague. Don’t be tempted to fit more power than you need, reasoning that you can always throttle it back – this is rather like saying you can learn to drive in a Ferrari, provided you keep a light foot on the throttle!
d) It should be robust and able to withstand heavy landings reasonably well. A well designed model, whether made of foam or balsa will be able to do this, although a hard crash will badly damage almost any model. All else being equal, smaller models tend to do much better in this respect than larger ones, especially if they are made from resilient foam.
e) It should be easily repairable. Kit built balsa models can be excellent in this respect. One of the main reasons for this is that if you built it, you’ll be intimately acquainted with its construction so you’ll have a much better idea of how to repair it. For similar reasons, balsa ARTF models tend not to score so well. Also, matching covering material can be hard to find, though this may not particularly bother you, especially if you like the idea of recovering the model. Foam models can be quite easy to repair, although they can start to look scruffy quite quickly around the joints.
With the above requirements in mind, let’s have a look at the choice of suitable model types for training:
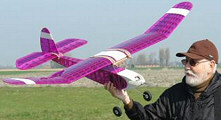
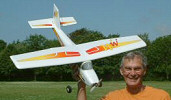
Electric
powered vintage style
models such as this
scaled down Lanzo
Record Breaker can
be delightful to fly,
as well as being excellent
training tools. |
A. Vintage
or ‘Old Timer’
style of model
Vintage models were generally
originally designed for
free flight (i.e. completely
uncontrolled), and so possess
plenty of natural stability.
Such a model would typically
be a three channel model
with controls for rudder,
elevator and throttle. It
would use ‘built up’
(traditional, balsa framed)
construction and be approximately
60 inches in wingspan. Because
of the slow flying speed
of vintage types, they don’t
tend to come to much harm
in a heavy landing, so its
fine if they are a little
on the larger side. Both
almost ready to fly (ARF/ARTF)
and kit models are available.
I believe this style of model is unquestionably the easiest to fly and is very suitable for the mature modeller - three channels are quite enough to cope with when learning to fly and such models also have excellent flying characteristics for a beginner – their slow flying speed coupled with plenty of natural stability give a new pilot time to think. This type of model allows take offs and landings to be practiced much more easily than with smaller alternatives.
With this style of model
it’s also possible
to successfully use either
a modern brushless system,
or else a ‘traditional’
brushed motor and suitable
ESC. Standard RC gear with
standard size servos is
quite acceptable. Wings
are held on with shock absorbing
rubber bands and this, combined
with a slow flying speed
gives a valuable measure
of resistance to damage
in a crash. The nostalgia
aspect of this type of model
may also be attractive to
the mature modeler, although
younger pilots may understandably
prefer a different style
of model. An example of
such a model is the Junior
Sixty.
B. Electric powered glider
Electric powered gliders
are another suitable option
for beginners. A typical
suitable example would also
be a built up three channel
model (no ailerons) up to
around 72 inches span.
One advantage of electric gliders that they enjoy inherently very low aerodynamic drag, so very little power is required to fly them. Consequently, long flights may easily be obtained even with inexpensive equipment. They usually fly slowly, giving plenty of time to think. However this low drag also means that they will tend to gain speed relatively quickly in a dive. The low drag can also make for landing difficulties if this has to be carried out in a confined space. Also, they are not generally as robust as a vintage style model. Electric gliders must be hand launched, so they don’t allow take offs and landings to be practiced.
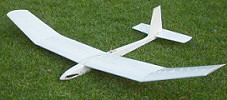
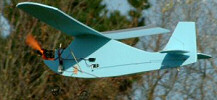
This
electric powered glider
is another suitable
model for training.
The propeller folds
back, reducing drag
for the gliding portion
of flight. Note the
wings are held on
with rubber bands.
This type of model
doesn’t handle
wind as well as other
model types, so if
your site is windy
this may not be the
best choice for you. |
Powered gliders typically have a little less natural stability than a vintage style model and the higher aspect ratio (long and thin) wing may tend to make pitch (elevator) control more sensitive, so elevator movement may need to be small. Again, standard size servos are quite acceptable unless opting for a smaller model.
This type of model can use either a brushed or brushless system. Brushed power systems used to be the only choice for this type of model, usually employing a ‘600’ motor and a 7 cell NiMH pack. This type of system is still available, but it isn’t really the best choice any longer. While it will work well enough for initial training purposes, it doesn’t make sense to invest in obsolete technology which will probably have no practical use for later models. It’s much better to install a modern brushless system from the beginning. This will be a lot lighter, allowing slower flight, and more importantly greater crash resistance.
C. ‘Standard’
Electric trainer
Until recently, electric
models designed specifically
for training purposes weren’t
all that easy to find. Happily
they’re much more
common now that manufacturers
have woken up to the demand
for them. By ‘standard’
electric trainer I mean
a model which is a direct
equivalent of the standard
i.c. trainer, which is generally
a 0.40 (over) powered 4
channel design (i.e. with
ailerons) spanning about
55-60 inches.
These models are relatively easy to fly, but nevertheless they generally don’t have the very forgiving flying characteristics of vintage style models. Their ‘modern’ appearance probably gives them more appeal for younger pilots, for whom their minor disadvantages are probably of less concern, especially if experienced help is to hand for early flights. Models of this type are usually built up (balsa) ARTF types. If you choose to go this route then a brushless power system is the way to go.
Multiplex’s
all foam MiniMag |
D. All
foam electric trainer
Several all foam electric
trainers are now available.
These are typically supplied
as quick assembly kits,
comprising a small number
of moulded foam components.
Three good examples of the
genre which are eminently
suitable for training purposes
are Mulitplex’s Easy
Star (54”, 3 channels,
very docile), MiniMag (39¾”
span, 3 or 4 channels, slightly
sportier) and Mentor (64”
span - larger, so better
for take offs and landings).
The foam used is a resilient type and therefore relatively crash resistant, plus the models aren’t too large. These models are excellent choices for beginners, especially if you want to ‘go it alone’. Of course, they won’t appeal to the traditionalist for whom models have to be made of balsa but they are undeniably good models to use for training purposes.
Again, I’d recommend a brushless power system in all cases for these models.
This
delightfully simple
park flyer is made
from a few small sheets
of blue foam. With
a small brushless/LiPo
power system this
was a very cheap model
to build, and didn’t
require a huge investment
in time either. |
E. Park
flyers
Finally, a mention must
also be made of the so called
‘park flyer’
models. Park flyers are
generally up to about 36
inches in span and always
light in weight. They’re
available in a variety of
types, from quick assembly
foam kits to fully assembled
and totally ready to fly
models. The choice of models
includes relatively docile
models that could be used
for training purposes. Due
to their small size, these
may not be ideal trainers
and will tolerate very little
wind, but nevertheless they
can be a viable way to learn
to fly. One big advantage
of such smaller, light weight
models is that they are
inherently more crash resistant.