|
|||
|
|
|
||
| View Shopping Cart |
| Home |
| Guides Available |
| About the Author |
| FAQs |
| Testimonials |
| Articles |
| Contact Andrew |
| Terms & Conditions |
| Mailing List |
| Links |
 |
 |
Gibbs Guides.com
More high
quality information absolutely
free with every
Gibbs Guides newsletter.
Sign
up now!
My journey from RC models to full size aircraft.
By Andrew Gibbs
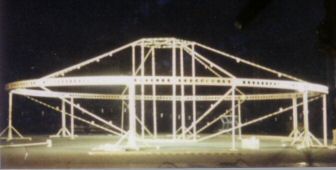
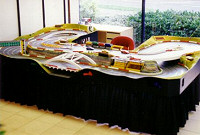
The
bare bones of a 30
foot diameter RC airship.
It was built from
balsa and ply and
fitted with helium
filled gas bags. My
father built each
of the 8 sections
in the family living
room! |
My first concentrated exposure to RC models was back in around 1978 through four back issues of RCM&E which my father brought home for me one evening. I was 13 or 14 years old and I studied these voraciously, absorbing everything I possibly could from them.
I think my enthusiasm for RC must have been obvious, because a little later on he also acquired the Flight Link radio control outfit from a 30 foot diameter flying saucer shaped RC airship which he’d built in our front room (yes really!) for the then newly formed company Skyship International.
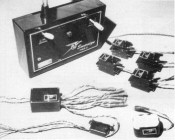
An
example of Flight
Link’s Sovereign RC system. |
I quickly realized that this set had been converted to control a number of large electric motors through relays and was useless for modeling purposes. Fortunately my father most kindly went to great expense and had it converted back to standard condition so I could use it.
I was deeply delighted to have a radio control system in my possession, and naturally I was keen to fit this now working system in a model. For my first attempt I decided to build a boat. My reasoning here was that I wanted to learn about RC without undue risk to my equipment – after all, this was a time when RC equipment was still relatively very expensive, and being a young schoolboy on a tight budget I didn’t want to spend my hard earned money on expensive RC system repairs which I feared could so easily result from an aircraft crash.
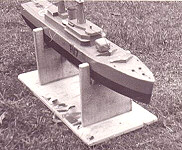
Sea
Rider on its stand.
This had to be quite
high to clear the
safety keel. No way
was I going to allow
my boat and its precious
RC system to capsize! |
I selected the Sea Rider design from the BBC publication Model World which appeared after a Saturday morning TV series of the same name. This was a free running (non controlled) model, but at 30 inches in length had sufficient space inside it to accommodate the RC system and the necessary batteries. I required some form of control for the motor, so I devised an arrangement using the resistance board from an old slot car controller and a micro switch. This worked well and gave proportional forward plus a one speed reverse.
I paid careful attention to waterproofing the balsa hull and fitted the model with a long and heavy lead keel so it couldn’t possibly capsize. It was then committed to the bath for tests. The Sea Rider leaked no water and seemed very stable. It went on to accumulate many hours at sea - well, the local freshwater mill pond actually! This model taught me a great deal, including how a relatively tiny electric motor could successfully power a relatively large (30 inch long) displacement hulled model boat. The motor must only have been a few watts in power, but it gave the model a cruise speed equivalent to a slow walk, perhaps 1 knot or so. Although the RC gear had DEAC cells (a kind of early nicad in a button shaped format) the propulsion motor initially used a dry (non rechargeable) 3V bicycle torch battery for power. This was selected as it offered the best value for money in terms of stored energy vs. cost. Later I purchased a pair of 2V 2.5Ah lead acid Cyclon cells which were linked in series. For some reason I found the subject of rechargeable batteries rather interesting, a quirk that lasts to this day as can be seen by the range of guides on offer here at Gibbs Guides!
However, aviation has always been my deepest passion, and the time was now near when I was ready to put the equipment in a flying model. Initially I designed myself a glider to accommodate the RC equipment. This was about 6 feet in span, and was essentially a scaled up free flight glider as that’s all I really knew about then. However, I had doubts that the design would be robust enough and decided not to build it. In hindsight, that was a pity as I think it would probably have been okay.
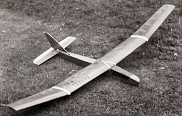
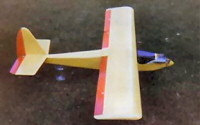
My
first RC model - Orange
Box, a design by Clive
Smalley. |
Anyway, I had a subscription to Aeromodeller, and the answer to my quest to find a suitable model presented itself in the form of a free plan in the April 1979 issue. This was for a 72 inch span 2 channel RC glider called Orange Box, designed by Clive Smalley, and was accompanied by some excellent instructions and a flying guide. This was what I needed! I was immediately hooked on this simple design and set about building it. I managed to make a fairly presentable effort of it. I think I covered the wings in clear doped orange nylon, while the tail surfaces received heavyweight tissue. I was delighted at last to own a proper model aeroplane with controls that actually responded to a transmitter. I could hardly wait to fly it.
I’d already built a number of free flight gliders, so I knew that Orange Box’s controls would be very powerful as they were huge compared to the tiny trim tabs I’d added to my free flight creations to guide them. All my other models had been flown in a nearby local park, so naturally the temptation was to fly this one there as well. For the very first flight I treated the model as a free flight glider – I checked it very carefully for balance, warps etc and found nothing wrong. I therefore expected that provided it was thrown correctly that it would fly itself without any help for me. I hand launched it over flat grass and as hoped, it glided gracefully about 15 yards ahead to the ground. A slight rise was present in part of the park, not really enough to call a hill, and I used this to increase the duration of flights. I well remember the great thrill as it responded to my careful, tiny control inputs. I think the longest flight was perhaps all of five seconds, but oh, what a five seconds!
I was already sufficiently obsessed with aircraft to have read countless books on flying and the theory of flight. I therefore knew a little about stalling and so on, so it was a relatively straightforward matter to progress from park flights to the local hills for a spot of slope soaring. Fortunately I had the sense to ask for some help learning to fly the thing, and I managed to master it without wrecking it. The only serious crash I remember the model having was on its first launch in the hands of the ‘expert’ I recruited to help me! In hindsight, perhaps he wasn’t so expert after all but he did rebuild the model’s fuselage overnight, covered it in fiberglass, and painted it orange. Meanwhile I attended to the repair of the wings. I was pretty gutted at the damage to my pride and joy and was very grateful for his help. Happily the model went on to complete many successful slope soaring missions and taught me a lot.
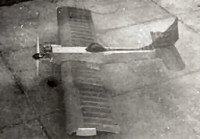
I
designed this control
line model when I
was 14 or 15. Up front
was my trusty Thunder
Tiger 25RC with the
throttle held wide
open. A tricycle undercarriage
was fitted which I
hoped would help protect
the new engine. I
never got around to
naming the model. |
About this time I bought a DC Merlin, a 0.75cc diesel, probably with the intention of fitting it to Orange Box so I could fly it from flat locations. Unfortunately this engine was not a success as I could never get it to run. I ended up breaking the con rod in a bad case of hydraulicing and sold the broken mess to an older school friend, who promptly repaired it and made it run beautifully!
In place of the Merlin I invested in an early model Thunder Tiger 25 glow engine. Compared to the Merlin this 4.2cc glow engine was an impressively large beast. I ran it in on a wooden test stand, and operating it was a thrill in itself, especially after the diesel disappointment. The engine was intended eventually for an RC trainer, but first I planned to gain experience with it in a control line model. I put pencil to paper and came up with a workmanlike stunt design. I was never brave enough to do more than loop my creation, but I remember it pulled very strongly as it circled around me on, I think 50 foot lines.
A
1976 advertisement
for the Jolly Roger
‘Standard’
– the 3 channel
version of Rojair’s
trainer. |
About this time, while still aged 15, I managed to get a Saturday job at my local model shop, Martlet Models of Chichester. I don’t know if the proprietor, (George Baldwin, a former Navy pilot) knew I wasn’t yet 16 but I wasn’t about to emphasize the point! I had to cycle 10 miles to reach the shop and 10 miles to get home again and I didn’t mind a bit. I probably spent most or even all of what I earned in that shop! One of my first purchases was a three channel Jolly Roger trainer kit to suit the '25' I already had.
Having become familiar with the engine, I removed it from the control liner in preparation for installing it in the trainer. I put a few drops of fuel into its carburetor and gave it a flick, not really expecting it to do more than just cough a bit. In fact, the engine sprung powerfully into life. The only problem was that I was in my bedroom at the time and was holding the engine in my left hand. I just had to wait, gripping the monster firmly while it used its fuel up! Ah, the foolishness of youth!
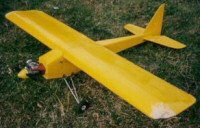
Having survived this incident, I installed the engine and the Flight Link RC gear in the Jolly Roger and covered the model in yellow Solarfilm, reasoning this colour would be easily visible in flight (it was a good choice, and I still like yellow models). The model had a steerable nose wheel and I took full advantage of this feature, spending many hours taxiing it in the local park. During these sessions a few brief but exhilarating straight ahead short hops were also made. Once I was thoroughly familiar with the model’s ground handling I visited a local club and asked for help to fly it properly. Perhaps because of to my gliding experience (and maybe also the hops!), I soloed it fairly
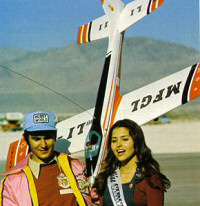
Wolfgang Matt with his impressive
Atlas. The young lady made quite an impression on me, too! Photo
courtesy of RCM&E magazine - www.modelflying.co.uk |
quickly and went on to enjoy the model enormously. I’m sure I spent far too much time flying this model, and nowhere near enough time attending to my ‘O’ levels. The model ended up accumulating so much flying time that I literally wore it out.
After that, I built myself a MK Mattlas 20, which at about 47 inches in span was a delightful reduced size version of Wolfgang Matt’s famous 60 powered Atlas pattern model. I carefully replicated the red and white scheme using Solarfilm, and the finished result looked gorgeous. The Thunder Tiger 25 may have been alarmed to find itself installed in this fully aerobatic model, but it proved insufficiently powerful and was replaced with a more powerful Kosmic 23, an Italian engine fitted with a Perry carb. No prizes for guessing where I bought that engine!
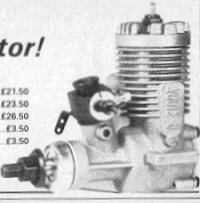
Kosmic
23 RC aero. This engine
retailed for £23.50
back in 1979 |
Unfortunately the Kosmik made the Mattlas far too hairy for me and I soon wrecked it by pulling ‘up’ while it was inverted at low level. The fundamental cause of the crash was that I’d not appreciated that it wasn’t really viable to move from 3 channel trainer to a ‘full house’ precision aerobatic ship. A much better idea would have been to buy an aileron trainer as my next model and perhaps a more powerful 0.40 engine.
My next RC model was a foam-winged Magicfly, which appealed me as it was (a) an aileron equipped model that wasn’t going to be too hairy and (b) was electrically powered – quite an innovation at the time. The model didn’t fly well (the story appears elsewhere on this site) but it did teach me a lot about minimum power flight.
The box art from MFA’s
48 inch span Magicfly. My example did fly, but not magically. |
Charging technology of the day consisted of connecting the pack to a 12V battery and timing the charge period, hoping you got it correct. I overcharged my pack one day, and one of the cells literally exploded, making a really substantial dent in the foam wing. I replaced the cell and designed a field charger for the pack which included a timer.
Electric flight was not yet mature enough to be practical, at least not for a 16 year old lacking suitable experience. By this time I was also messing about with electric RC cars, and had built a Mardave track racer, several Tamiya buggies and designed my own racing car. These all worked very
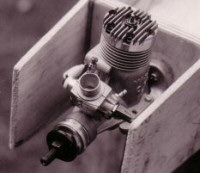
The
OS40 bought to power
SkySpy. The model
was really a little
large for this engine,
which turned out to
be only just powerful
enough. |
well indeed and unlike the Magicfly had plenty of performance. I also built a few electric models for customers of the model shop where I was still working. These included several Rough Riders and Sand Rovers, plus an i.c. powered control line model which was probably a Keil Kraft Phantom.
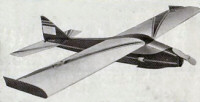
For an ‘A’ level project, I was required to do something practical. My obsession was still in full flow, so naturally my thoughts turned to aeromodelling. The tutor approved my proposal to design and build an RC model equipped with a small camera. At 74 inches in span, the resulting model was larger and heavier than anything I’d built so far.
SkySpy
was a rather unadventurous
design – but
it worked. Proportional
flaps were an interesting
feature to experiment
with. |
It incorporated flaps and had to have camera shutter control, so a 6 channel RC system was required. Accordingly, I splashed out on both a new 6 channel Fleet RC system and a shiny OS40, which was quite an investment at the time - but easily justified as an investment in my education! I called my design SkySpy and had a lot of fun with it – and gained one of my A levels!
After ‘A’ levels the grim business of real work was assuming an increasing importance. I sold most of my models and RC equipment and knuckled down to earning a crust. This seemed to be leading nowhere, so
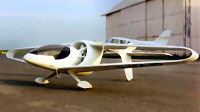
My
White Diamond design,
completed 1989. |
I decided to study for a degree. I was applied to study transportation design at Coventry Polytechnic. At the interview my hastily prepared portfolio of work relied heavily on my RC designs. The 4 year course was greatly over applied for and I felt very fortunate to be accepted. So began a period of extremely hard and wonderfully interesting work. For my final year project I decided to come up with a conceptual microlight aircraft design. I put in a great many 100 hour weeks to complete this project and named the eventual design White Diamond due to its diamond wing configuration.
By now it was clear that aviation was getting to be a bit of a theme in my life. A year or two after gaining my design degree I decided to become a professional pilot, which looking back I suppose was pretty much inevitable. This became my next all-consuming
My
Wot 4, photographed
here in 1996 and starting
to look a bit battered. |
occupation and after a lot of study and a great deal of expense I became the owner of a professional pilot’s license.
To fund the license I’d taken various jobs, one of which was as a model maker for Lego, who were building their new theme park in Windsor. It was quite fun to be paid to design and build Lego models! One day I spotted a battered Wot 4 for sale which I restored to flying status, and installed ‘L’ series Futaba RC gear along with an OS35FP. I used this combination to teach myself aerobatics.
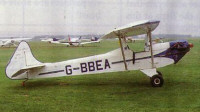
Luton
Minor G-BBEA. A converted
VW Beetle engine provided
power. This machine
provided really enjoyable
and cheap open cockpit
flying. |
The poor Wot 4 experienced the same fate as my other models and frequently found itself airborne. The more I flew this model the more impressed I was with its qualities. I also noticed that my approach to teaching myself aerobatics had matured – I was now much better able to tackle new maneuvers such as inverted flight and so on. The important thing, I realized was to have height in hand plus an ‘escape plan’, in other words a pre-determined method of recovery if things went pear shaped, which they did, often. As well as flying the Wot 4 I also racked up hours in a full sized LA4A Luton Minor in which I’d bought a 1/8 share.
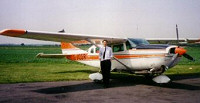
My
trusty Cessna 207.
The tube under the
fuselage was part
of a special low noise
silencer system. |
My first flying job materialized in 1996 in the form of survey flying. My steed was an ugly Cessna 207 which had a huge camera bolted to its floor. The job was based at Sandtoft airfield in Yorkshire, from where RAF bombers used to fly raids in WW2. I lived right on the airfield, in an old 12 foot caravan parked just outside a hangar, right next to a dead jet engine. Luxury it was not, although gainful flying employment it most certainly was, and in any case I had some serious flying training debts to pay off. The Wot 4 lived with me (bachelor heaven!) and every now and then it would come out for a low level aerobatics session above the runway.
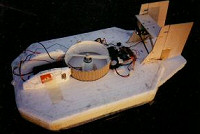
Polystyrene
Peril – an electric
power hovercraft. |
One of the other ways I filled the time in between photographic missions was designing a simple electric powered hovercraft, built from 1 inch polystyrene foam. It was nicknamed the Polystyrene Peril. The model used the two motor approach, one for lift and one for thrust. The lift air was channeled to a slot around the craft’s perimeter and fed into a skirt which was made from thick polythene. This model worked well, although directional control would have been much better if the rudders had been closer together and therefore more directly in the slipstream.
Well, they say all good things come to an end and this first flying job lasted one summer, after which I found myself living back at my parent’s house, ‘between jobs’ as its called. It was at this time I built a large portable
The
large slot car track
which I built while
unemployed –
an all too common
feature of a newly
qualified pilot’s
life. |
slot car track, though I continued to take the Wot 4 out for aerobatics sessions.
One of my most memorable recollections of the model was while flying it from a nearby field. My mobile phone trilled and, not wanting to miss the call I quickly throttled back, added some up trim and answered, only to find it was one of the prospective aviation employers I’d written to. I was interviewed while I kept the model airborne - I didn’t dare land it as this might have distracted me too much so I just kept it flying around! Who says men can’t multi-task!? At the end of the call I was invited to a face to face interview.
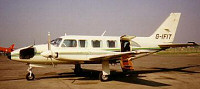
Piper
PA31-350 Chieftain. |
I went along (without the Wot 4) and got the job, which was to operate a Piper Chieftain as an air taxi for a Bournemouth based freight airline. At this point, model flying took a back seat again while I got on with enjoying my flying career. Happy days!